Calendar and Events Feed
There are a number of options available for creating an events feed and/or calendar for your site. To discuss your options or request the creation of a new calendar for your site, please visit the ServiceNow Service Portal and navigate to Request a Service > Web Services > Omni CMS > General Site/Page Update Request - Omni CMS.
This page describes the steps required to setup and use the events feed to display events from a calendar. Since the most common tasks are described first, the configuration of a calendar and events feed on a new site would need to start at the end of the page and work backwards.
Events Feed
If an events feed has not been configured on a site, or the user wants to display specific events independet of the feed, they do have the option of using the Feed: Calendar Events - Manual component. This component allows them complete control over the displayed events, but must be manually updated to remove past events.
Once the events feed has been configured on a site, the only interaction most users will have with it is to add a Feed: Calendar Events - Omni Calendar component to their page. The component will only display the next three current/future events (optionally filtered by tags), automatically removing events as their ending time or the event date passes.
To update the feed with new/modified event information, someone must publish the events feed. The feed is located at /_resources/data/calevents.pcf.
To navigate to this file, the user must be a member of the site's site-admin group, or the access requirements for the /_resources/data/ folder must be modified.
The feed can be scheduled to publish on a regular basis (e.g. daily at 11 PM), or someone will have to publish it after changes are made to the calendar.
To configure the events feed, check out /_resources/data/calevents.pcf and select Edit > Properties. The feed only has one property: External XML URL. The value of this property is the RSS URL for the calendar that populates the events feed.
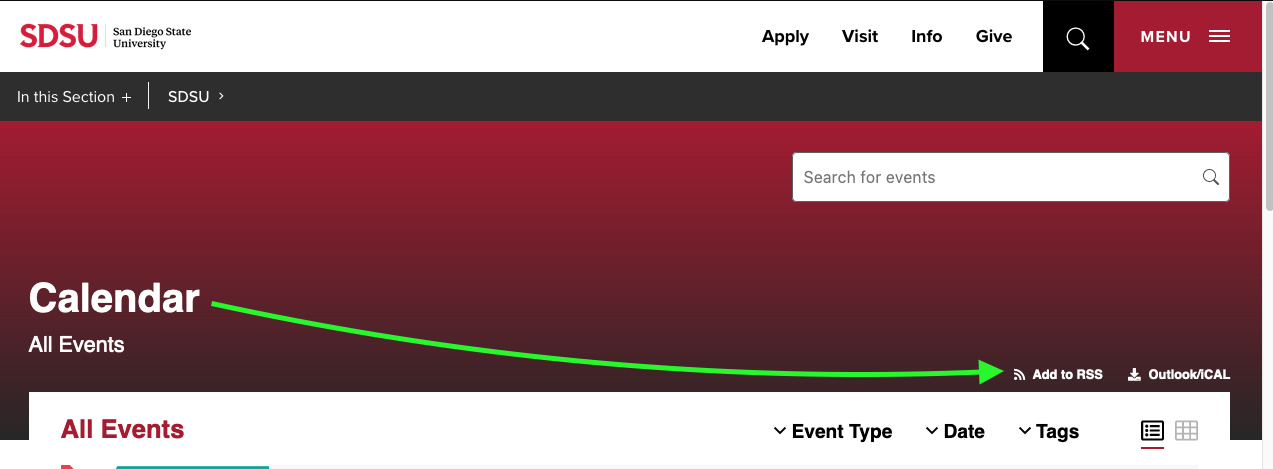
To get the RSS URL, open the calendar page in the browser and find the Add to RSS link (usually on the right above the list of events, below the search bar). Copy the URL (e.g. right-click the link and select Copy Link), then paste it into the External XML URL field.
Calendar Page and Asset
A New Calendar Page template is available to create a page to host the calendar embed code. If you do not have access to this option when using the +New button in your site, contact the site administrator or open a ticket in ServiceNow.
- Navigate to Content > Pages
- Select New Calendar Page from the +New button.
- Set the Page Title and Filename (and other options) as desired in the New Calendar Page dialog.
- Use the Create button to dismiss the New Calendar Page dialog and create the page.
- If a calendar asset has not been created, yet, Create a Calendar Asset.
- Open the Calendar Asset region on the newly-created calendar page.
- In the Select Asset dialog, select the desired Calendar Asset.
- Use the Insert button to insert the asset and dismiss the Select Asset dialog.
- The preview of the page should update to display the calendar.
- Publish the page.
If the desired Calendars/Subscriptions are not available within the Calendar Module, yet, Create Calendars and Subscriptions. If you do not have access to the Embed Code option in the Calendar Embed Settings, contact the site administrator or open a ticket in ServiceNow.
- Navigate to Add-Ons > Calendar.
- Navigate to Embed Code in the side navigation.
- Select the Calendars and Subscriptions you would like to display in the Calendar Asset.
- Optionally, use the settings in the Calendar Embed Settings to change the settings for the Asset. (This is a collapsible region typically displayed below the Configuration section in which Calendars are selected and the Embed Code is displayed. The Calendar Embed Settings allow you to change the Title, Subtitle, Header Image, Default Layout, and many other options.)
- Use the Copy Code link to copy the Embed Code.
- Navigate to Content > Assets
- Use the +New button to create a new Source Code asset.
- Set the Name and Access Settings as desired (usually the Access Group is either set to the site's site-admin group or to the calendar approval group).
- Paste the Embed Code into the Asset Content area.
- Use the Create button to create the asset.
Once the calendar module is enabled on your site, you will need to add one or more Calendars or Subscriptions (calendar RSS Feeds) to your site's calendar. A Calendar allows you to manage events within your site's calendar module, while a Subscription allows you to pull in events managed somewhere else (on another site's calendar or in some cases in a different calendar/events system).
Create a Calendar
- Navigate to Add-Ons > Calendar
- At the bottom of the side-navigation, there are two options for creating a new Calendar: Use the +New link or select the downward-facing caret next to the Calendars heading and select New Calendar from the dropdown list.
- Enter a name for the Calendar
- If you used the +New link, press Enter after inputting the name to create the Calendar. If you used the New Calendar link in the dropdown, you can set the Access Group and Approval group and choose a color for the calendar before using the Add button to dismiss the New Calendar dialog and create the Calendar.
Create a Subscription
- Navigate to Add-Ons > Calendar
- At the bottom of the side-navigation, select the downward-facing caret next to the Calendars heading and select New Subscription from the dropdown list.
- In the New Subscription dialog:
- Enter a name for the Subscription
- Enter a URL for an ICS feed (when subscribing to an Omni CMS Calendar, this URL would be provided by the Outlook/iCAL link in the calendar's heading, next to the Add to RSS link).
- Set the Sync Frequency (usually Daily).
- Optionally select an Access Group and Color for the Subscription.
- Use the Add button to create the Subscription and dismiss the New Subscription dialog.